260-1971-00/Repairs: Difference between revisions
Jump to navigation
Jump to search
No edit summary |
m (wording: exchanged "contact bar" "with plunger") |
||
| Line 1: | Line 1: | ||
==Repair of push switches== | ==Repair of push switches== | ||
Tektronix push switches like 260-1971-00 can fail when the end of the green | Tektronix push switches like 260-1971-00 can fail when the end of the green plunger breaks, releasing the contact springs of the last 2 poles. | ||
In that case the repair can be done even when mounted to PCBs, see repair section of DM501A. | In that case the repair can be done even when mounted to PCBs, see repair section of DM501A. | ||
| Line 6: | Line 6: | ||
==Disassembling The Push Button== | ==Disassembling The Push Button== | ||
Remove spring retaining ring and spring. | Remove spring retaining ring and spring. | ||
Push and hold the | Push and hold the latching bar with a small screw driver or toothpick and push in the green plunger slowly and carefully to be able to take away the contact springs. Otherwise the contacts might jump out of the pockets. | ||
==Assembling The Push Button== | ==Assembling The Push Button== | ||
Slide in the green | Slide in the green plunger with the rear holder pin in the right position until the the first two spring contact pockets reach the end of the push button housing. | ||
Place spring contacts on both sides in the pocket with round edges facing away from the green | Place spring contacts on both sides in the pocket with round edges facing away from the green plunger. | ||
Hold the spring contact and push in the green | Hold the spring contact and push in the green plunger further util the next contact pockets are in place. | ||
When the green | When the green plunger gets stuck while pushing in, push and hold the latching bar with a toothpick. | ||
When all contact springs are in place and the green | When all contact springs are in place and the green plunger is fully pushed inside the button housing, place spring and spring retaining ring on the green plunger. | ||
==See Also== | ==See Also== | ||
| Line 20: | Line 20: | ||
==Pictures== | ==Pictures== | ||
<gallery> | <gallery> | ||
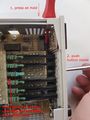
Tek-260-1971-00-rep1.jpg | Dissasembling - | Tek-260-1971-00-rep1.jpg | Dissasembling - Latching bar marked with red arrows | ||
Tek-260-1971-00-rep2.jpg | Removed left | Tek-260-1971-00-rep2.jpg | Removed left plunger and visible latching bar | ||
Tek-260-1971-00-rep3.jpg | | Tek-260-1971-00-rep3.jpg | Plunger with spring contacts in the contact pockets | ||
Tek-1260-1971-00-rep4.jpg | Defect | Tek-1260-1971-00-rep4.jpg | Defect plunger on top and new plunger below | ||
Tek-DM501A-rep-switch.jpg |Example on how to replace the | Tek-DM501A-rep-switch.jpg |Example on how to replace the plunger in a [[DM501A]] | ||
</gallery> | </gallery> | ||
Revision as of 10:06, 2 January 2021
Repair of push switches
Tektronix push switches like 260-1971-00 can fail when the end of the green plunger breaks, releasing the contact springs of the last 2 poles.
In that case the repair can be done even when mounted to PCBs, see repair section of DM501A.
Disassembling The Push Button
Remove spring retaining ring and spring.
Push and hold the latching bar with a small screw driver or toothpick and push in the green plunger slowly and carefully to be able to take away the contact springs. Otherwise the contacts might jump out of the pockets.
Assembling The Push Button
Slide in the green plunger with the rear holder pin in the right position until the the first two spring contact pockets reach the end of the push button housing.
Place spring contacts on both sides in the pocket with round edges facing away from the green plunger.
Hold the spring contact and push in the green plunger further util the next contact pockets are in place.
When the green plunger gets stuck while pushing in, push and hold the latching bar with a toothpick.
When all contact springs are in place and the green plunger is fully pushed inside the button housing, place spring and spring retaining ring on the green plunger.
See Also
Pictures
-
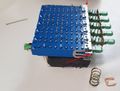
Dissasembling - Latching bar marked with red arrows
-
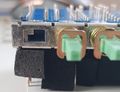
Removed left plunger and visible latching bar
-
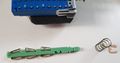
Plunger with spring contacts in the contact pockets
-
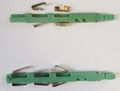
Defect plunger on top and new plunger below
-
Example on how to replace the plunger in a DM501A


