Before you proceed, the 1230 claims both in software and internally that this repair should be done by a qualified repair technician.
Someone has told me there is a specific repair procedure to follow. They did not know what it was but said it has something to do with retaining saved data.
Until we have the 1230 service manual, we won't know. While you will not retain your saved data, these steps do work to leave a fully functional machine.
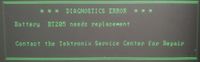
Your 1230 boots saying "Battery BT205 needs replacement".
Your 1230 fails startup diagnostics on "#2 XXX→C3H" and/or "#8 XXX→86H" saying "Stored Setup Checksum Failed".
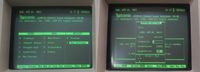
Settings after reboot
Solution:
Replace the two 3 V CR2330 CMOS batteries. NOTES: There is the BT205 and the BT230. They are located on top edge of the 1230 mainboard. They are raw CR2330 cells, captured by a holder. The machine doesn't seem to care at all about a damaged or missing BT230. It does very much care about a damaged or missing BT205.
Steps:
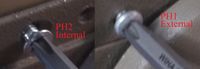
Step 1 - shut down Shut the 1230 down. With a finger on one of the external 4 PH1 silver screws on the side, unplug the machine from mains. NOTES: Doing this should clear you of static charges if you're not working with a grounding strap. USE A GROUNDING STRAP!
Verify the 1230 is turned off and unplugged. NOTES: I've been told to cycle the machine on and off 3 times while unplugged to discharge stored voltages.
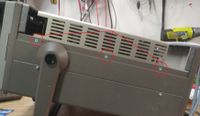
Step 3 - Remove cover screws Remove the 4 external cover's PH1 screws. Then remove external cover.
Step 4 - Remove internal screws Remove the 3 internal PH2 screws. They are located on the side with the expansion card bracket. The screws are flush with the chassis, in-between where the external cover sits. NOTES: The 3 internal PH2 screws are weak. Do not over-tighten or you will strip them out. Use the proper size PH2 bit or you will strip them out.
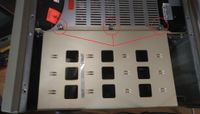
Step 5 - loosen thumb screws Loosen the spring-loaded thumb/flat-head screws. Remove the expansion card bracket. NOTES: The screws are captured with-in the expansion card bracket.
Step 6 - Remove batteries Remove both BT205 and BT230. These battery holder tabs are quite strong. I used a plastic spudger to leverage the tab off the side of the battery holder and slid them out. NOTES: DO NOT DROP THE BATTERIES! Perfect size to wedge between pins of the components! If dropped, the leaked electrolyte can spread causing later damage down the line.
Step 7 - check for leakageStep 7 Check for leakage around the BT205 and BT230. Check the expansion board on the bottom of the case. Check your expansion cards too. NOTES: If there is leakage, clean it. I was able to use a plastic tooth pick, a cotton swab, and 99% IPA. If it's really bad, you'll need to take the board out and give it a full cleaning. It's possible that the batteries leaking has damaged the PCB, so check for broken traces and PCB damage.
Step 8 - boot After everything is cleaned, changed, and repaired, you can boot the 1230. NOTES: It will display the "Battery BT205 needs replacement" after you changed the BT205. Simply power cycle the machine. Message will not show on subsequent power cycles.
Step 9 - enable startup diagnostics If the startup diagnostic isn't enabled, you can enable the setting by going into the menu, then the sys settings, and finally turning on diagnostics.
After all the settings are stored, you can reboot the machine. If everything went well, it should now work as expected.