Restoring 1220, 1225 and 1230 keypad: Difference between revisions
Jump to navigation
Jump to search
No edit summary |
No edit summary |
||
| (6 intermediate revisions by 3 users not shown) | |||
| Line 1: | Line 1: | ||
'''''See also →''' [[Rebuilding 1230 keypad using 3D printer]]'' | |||
==Description== | ==Description== | ||
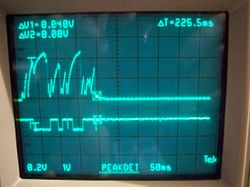
[[Image:Bounce(1).jpg|thumb|left|250px|(Pic1) "Bouncing" switch, the second trace is the signal coming out of a | |||
[[Image:Bounce(1).jpg|thumb|left|250px|(Pic1) "Bouncing" switch, the second trace is the signal coming out of a [[Schmitt trigger]].]] | |||
[[Image:Bounce(2).jpg|thumb|right|250px|(Pic2) Registered presses being sent to the LA.]] | [[Image:Bounce(2).jpg|thumb|right|250px|(Pic2) Registered presses being sent to the LA.]] | ||
*The [[1220]], [[1225]] and [[1230]] have a keypad interface for controlling them. The switches are tactile switches with a small spring. Over time they start to become extremely "bouncy". This is due to a number of factors, some including corrosion and weakening springs. Over time this will lead to problems such as the | *The [[1220]], [[1225]] and [[1230]] have a keypad interface for controlling them. The switches are tactile switches with a small spring. Over time they start to become extremely "bouncy". This is due to a number of factors, some including corrosion and weakening springs. Over time this will lead to problems such as the keypad being less responsive and the analyzer registering multiple presses. | ||
< | |||
Picture 1 shows what the keypad is registering. | |||
<div style="clear: both"></div> | |||
==Fix== | ==Fix== | ||
[[Image:Bounce(4).jpg|thumb|left|250px|(Pic3) Keypad switches]] | [[Image:Bounce(4).jpg|thumb|left|250px|(Pic3) Keypad switches]] | ||
[[Image:Bounce(5).jpg|thumb|right|250px|(Pic4) Keypad switches]] | [[Image:Bounce(5).jpg|thumb|right|250px|(Pic4) Keypad switches]] | ||
*The switches that the keypad uses are still being manufactured today. They are C&K D6L90F1LFS | * '''WARNING!''' When taking the analyzer apart, users are at their own risk! The inside contains lethal voltages and precaution must be taken. | ||
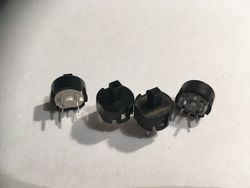
*The switches that the keypad uses are still being manufactured today. They are C&K D6L90F1LFS and the D6L90F2LFS, they are the exact same. The difference being the force required to push the buttons. One takes 1.3 Newtons and the other 2 Newtons (Pic3). The keypad has 26 of them. Replacing them with new ones will fix the excessive bouncing. When de-soldering the switches one has to be careful of burning the PCB and lifting pads because the traces are very small. | |||
< | |||
:→ [[Media:D6L90F1LFS.pdf|Datasheet for D6L90F1LFS and D6L90F2LFS ]] | |||
< | <div style="clear: both"></div> | ||
==Conclusion== | ==Conclusion== | ||
[[Image:Bounce(3).jpg|thumb|left|250px|(Pic5) Restored keypad.]] | [[Image:Bounce(3).jpg|thumb|left|250px|(Pic5) Restored keypad.]] | ||
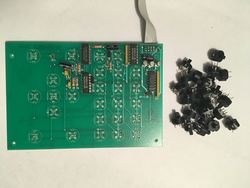
*It is not known how long this fix will last, but it makes the unit usable again. After the replacement the signal is now clean | * It is not known how long this fix will last, but it makes the unit usable again. After the replacement the signal is now clean (Pic5). | ||
[[Category: | [[Category:Instrument repair reports]] | ||
Latest revision as of 06:58, 19 January 2022
See also → Rebuilding 1230 keypad using 3D printer
Description


- The 1220, 1225 and 1230 have a keypad interface for controlling them. The switches are tactile switches with a small spring. Over time they start to become extremely "bouncy". This is due to a number of factors, some including corrosion and weakening springs. Over time this will lead to problems such as the keypad being less responsive and the analyzer registering multiple presses.
Picture 1 shows what the keypad is registering.
Fix


- WARNING! When taking the analyzer apart, users are at their own risk! The inside contains lethal voltages and precaution must be taken.
- The switches that the keypad uses are still being manufactured today. They are C&K D6L90F1LFS and the D6L90F2LFS, they are the exact same. The difference being the force required to push the buttons. One takes 1.3 Newtons and the other 2 Newtons (Pic3). The keypad has 26 of them. Replacing them with new ones will fix the excessive bouncing. When de-soldering the switches one has to be careful of burning the PCB and lifting pads because the traces are very small.
Conclusion

- It is not known how long this fix will last, but it makes the unit usable again. After the replacement the signal is now clean (Pic5).